BTRFS Guide - Basic Commands, Snapshots, and RAID

This guide goes over everything you need to know to get started on BTRFS. With that said we will be going over the basic structure of BTRFS and the things you should and should not do.
Creating a BTRFS Filesystem
Create the file system on an empty btrfs partition
mkfs.btrfs /dev/sda1
Note: You will need to mount this file system after
Now we need to make a subvolume before we add data to the device
btrfs subvolume create /mnt/sda1/mnt/sda1 is the mount point!
After this is complete you can now write data to your BTRFS volume and use all it capabilities.
Basic BTRFS Layout
Note: Top Level 5 is root and isn’t a btrfs subvolume that can do snapshots and other btrfs features and therefore should not be mounted
toplevel root level 5
  +-- root\@ level 256 (subvolume root mounted at / id varies)
  +-- root\.snapshots level 256 (typical snapshot subvolume)
Basic Commands
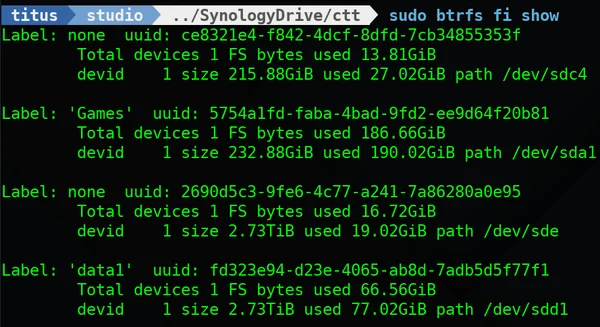
- Disk free
sudo btrfs fi show
Output:
- Disk Usage
sudo btrfs fi du /Note: you can make / any other mount point - Scrub SubVolume Recommended running every week!
sudo btrfs scrub start / - Balance Subvolume for Performance
sudo btrfs balance start -musage=50 -dusage=50 /
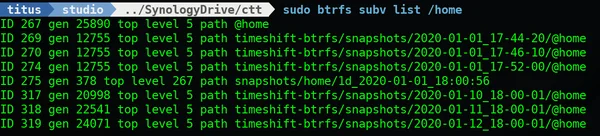
Note: Use the musgae and dusage filters to only balance used blocks above 50 percent utilizationsudo btrfs balance cancel /Stops running balance - List Subvolumes based on mountpoint
sudo btrfs subv list /home
Output:
- Mount Subvolume
sudo mount -o subvolid=267 /dev/sda1 /media/games
OR add this to/etc/fstabUUID=IDGOESHERE /media/games rw,exec,subvolid=267 0 0
Snapshots
Snapshots are one of the best things about BTRFS and I absolutely love them. They are incredible powerful and beneficial.
So Lets run through some scenarios when you use Snapshots.
Create Snapshot
sudo btrfs subv snapshot /home /home/.snapshots/2020-01-13
Using this you can revert the snapshot by simply editing the /etc/fstab and changing the subvol=2020-01-13 or the corresponding subvolid you get from sudo btrfs subv list /home
Restore Snapshot
Restore Snapshot after reboot and successful rollback
sudo btrfs subv delete /homesudo btrfs subv snapshot /home/.snapshots/2020-01-13 /home
Now simply restore your fstab and reboot to be back on the /home subvolume.
The reason to do it using this method is to verify the data first. If it doesn’t work out you can simply change the /etc/fstab back and you will be back to where you started.
Multiple disks and RAID
Oh boy, here we go. This is such a badly misunderstood subject and if you aren’t careful you will be causing more problems than you are looking to solve. So with that let’s get into RAID. I will NOT be cover RAID 5 as it is unstable and SHOULD NOT BE USED!
Must know commands for multiple disks:
Add Disks before creating subvolume:
sudo btrfs device add /dev/sda1 /dev/sdb1
Add Disk to existing subvolume:sudo btrfs device add /dev/sdb1 /home
Delete Disk from subvolume:sudo btrfs device delete /dev/sdb1 /home
Creating the RAID File System:
RAID 1:
sudo btrfs -m raid1 -d raid1 /dev/sda1 /dev/sdb1
RAID 10:sudo btrfs -m raid10 -d raid10 /dev/sda1 /dev/sdb1 /dev/sdc1 /dev/sdd1
Convert to to RAID 1 after adding disk to existing subvolume
btrfs balance start -mconvert=raid1 -dconvert=raid1 /home
I could put RAID 0 here… but honestly you should just use EXT4 or XFS if you are looking for performance. It would be better than using BTRFS!