Macos on Linux
This shows you all the steps to install a MacOS VM in Linux QEMU using Virtual Machine Manager or virt-manager.
Newer Source, but not as polished: https://github.com/kholia/OSX-KVM Mac KVM Repository: https://github.com/foxlet/macOS-Simple-KVM
Requirements
- A modern Linux distribution. E.g. Ubuntu 20.04 LTS 64-bit or later.
- QEMU >= 4.2.0
- A CPU with Intel VT-x / AMD SVM support is required (
grep -e vmx -e svm /proc/cpuinfo)
Installation Preparation
Install QEMU and modify your user using https://christitus.com/vm-setup-in-linux Guide.
Clone this repository on your QEMU system. Files from this repository are used in the following steps.
cd ~
git clone --depth 1 --recursive https://github.com/foxlet/macOS-Simple-KVM
cd macOS-Simple-KVM
Installation Media
This downloads our installation media and I’d recommend using Catalina for compatibility and performance.
./jumpstart.sh --catalina
Note: Modern NVIDIA GPUs are supported on HighSierra but not on later versions of macOS. Recommended PCI Passthrough GPU is 5700XT as this works on Catalina and above. If you go with a 6000 Series Card only certain ones will work on Big Sur and Monterey, but not earlier releases.
Virtual Machine Setup
I recommend using Virtual Machine Manager (virt-manager) as it has a fantastic interface and Simple-KVM does a great job with their setup script. Simply type the following to get the macOS VM setup:
sudo ./make.sh --add
VM Modification
Before we can start out VM we have to have a hard drive to load it. You have two options: physical hard drive passthrough or qcow2 file.
Obviously, the physical drive is considerably faster, but not possible in some instances such as laptops or if you can’t afford a secondary drive.
Physical Hard Drive Passthrough
This is pretty simple as you just click Add Hardware -> Storage and then specify your hard drive.
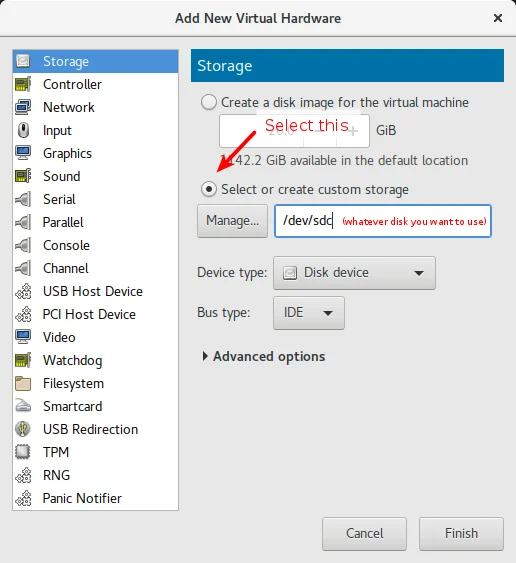
Note: while you can use drive short names /dev/sda I’d recommend using /dev/disk/by-id/HARDDRIVESERIAL as this doesn’t ever change.
QCOW2 File for Hard Drive
This is even simpler as you just click Add Hardware -> Storage and create new file. Just make sure you put it on at least a SSD or a nvme drive as it will be super slow if you don’t.
Install Process
Boot your machine and select the OS Install Partition on startup.
Use the Disk Utility tool within the macOS installer to partition, and
format the virtual disk attached to the macOS VM.
TIP: Using a non-APFS filesystem is recommended.
Go ahead, and install macOS
Post-Installation
Bridge Networking
*First_ find your card interface name
ip a
Example: (Interface name is enp7s0)
1: lo: <LOOPBACK,UP,LOWER_UP> mtu 65536 qdisc noqueue state UNKNOWN group default qlen 1000
    link/loopback 00:00:00:00:00:00 brd 00:00:00:00:00:00
    inet 127.0.0.1/8 scope host lo
       valid_lft forever preferred_lft forever
    inet6 ::1/128 scope host
       valid_lft forever preferred_lft forever
2: enp7s0: <NO-CARRIER,BROADCAST,MULTICAST,UP> mtu 1500 qdisc fq_codel state DOWN group default qlen 1000
    link/ether 24:bb:ee:55:22:33 brd ff:ff:ff:ff:ff:ff
    inet 10.0.0.99/24 brd 10.0.0.255 scope global
    valid_lft forever preferred_lft forever
    inet6 ::1/128 scope host
    valid_lft forever preferred_lft forever
Second Update /etc/network/interfaces
source /etc/network/interfaces.d/*

# The loopback network interface
auto lo
iface lo inet loopback

# The primary network interface - old entry
# allow-hotplug enp7s0
# iface enp7s0 inet dhcp

# The primary network interface - new entry
# DEVICENAME = enp7so for this pc and MYUSERNAME need to be $(whoami)
auto br0
iface br0 inet dhcp
  bridge_ports DEVICENAME tap0

auto tap0
iface tap0 inet dhcp
  pre-up tunctl -u MYUSERNAME -t tap0
Lastly Restart the networking service or reboot computer. Then change your VM NIC (Network Hardware) to br0 interface.
sudo systemctl restart networking
Other Considerations
- GPU Passthrough (Requires two Graphics Cards) - https://github.com/foxlet/macOS-Simple-KVM/blob/master/docs/guide-passthrough.md
- Changing Screen Resolution - https://github.com/foxlet/macOS-Simple-KVM/blob/master/docs/guide-screen-resolution.md
- Optimizing System Performance - https://github.com/sickcodes/osx-optimizer
- Sound - Two methods, Pass the audio through HDMI if using GPU Passthrough OR Pass through a USB sound card that is macOS compatible
- Note: There is a way to use Voodoo kext or AppleALC, but it will crackle and sound terrible