NTLite Guide

This Guide shows you the easiest way to configure Windows and make an ISO with NTLite.

Overview
NTLite is the best program for making an ISO for a Windows Environment. You have every option you could need, but is often overwhelming for new users. It’s why when you pull up NTLite Guide on YouTube you get 30+ Minute long videos.
These options are great for IT Professionals, but for a normal user it is too much and most normal users just end up with a broken Windows install ISO.
That is where import existing profiles that have already been tested by the NTLite community comes into play. You simply unpack the official ISO, apply the profile, and make your custom ISO!
Prerequisites
- NTLite costs $40 for a home user and is worth every penny in my opinion. Download and buy from their website https://ntlite.com
- Download the presets to import from my GitHub Repository https://github.com/ChrisTitusTech/ntlite-configs - Credit for it’s creation goes to Txmmy from NTLite forums. I’m using GitHub to maintain and update it based on user requests.
- Install 7zip to extract files from Windows ISO - Windows Terminal install with
winget install --id=7zip.7zip -e - Download the official Windows ISO https://www.microsoft.com/en-us/software-download/windows10

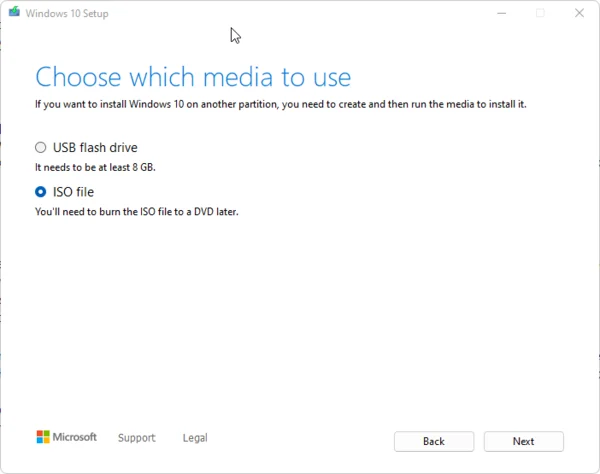
Note: In windows it will default to “Media Creation Tool” to make the iso (see above) You can use Mac/Linux to direct download ISO or User Agent Switch Browser Extension to trick Microsoft
The Setup
These are the following steps for the NTLite to make a proper ISO. Extract the Official ISO, Add ISO Files, Load Files, Apply Imported XML Profile, Save New ISO!
Extract Windows ISO File
Right click your windows.iso file and select the “extract files”. If you don’t see the extract files in the context menu then you did NOT install 7zip OR in Windows 11 you need to select “show more options”
Preparing NTLite
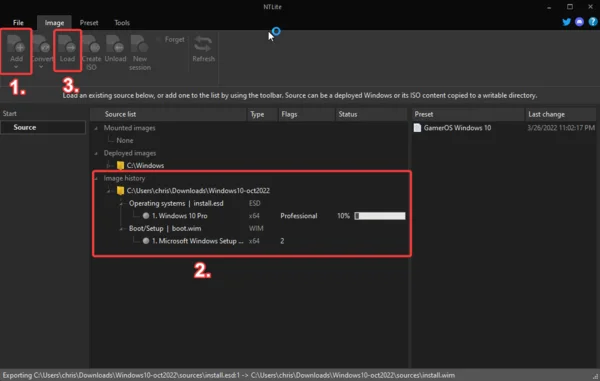
Look at the image below and add the files you extracted above. Follow these steps in order:
- Select Folder from Add Menu
- Delete unneeded Windows versions Ex. Windows Pro N or Windows Educational
- Select the Version you DO NEED after before move to Apply
- Import the Presets XML File
- Apply to load the files Note: This will take a LONG time 5-10 minutes on fast systems

Customize Image
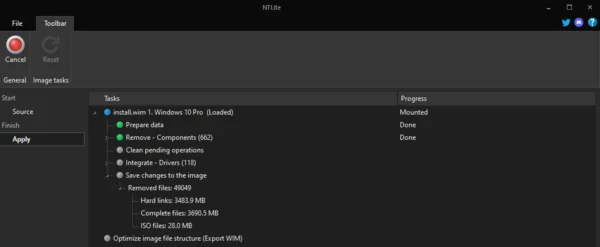
There are a TON of customizations you can do here, but DO NOT OVER DO IT! Past the imported presets that automatically set the services you need and a few other quality of life settings, you should also import the drivers for the system you are installing it on. This speeds up the post-install time.
Once you have everything the way you want it, simply apply the settings.

Note: This is the longest of all the stages and took almost 15 minutes on a good system
Dummy Keys for Windows 10
Here is the list of generic keys for various Windows 10 Editions.
| Windows 10 Edition | Generic Keys |
|---|---|
| Windows 10 Home | YTMG3-N6DKC-DKB77-7M9GH-8HVX7 |
| Windows 10 Home N | 4CPRK-NM3K3-X6XXQ-RXX86-WXCHW |
| Windows 10 Pro | VK7JG-NPHTM-C97JM-9MPGT-3V66T |
| Windows 10 Pro N | 2B87N-8KFHP-DKV6R-Y2C8J-PKCKT |
| Windows 10 Pro for Workstations | DXG7C-N36C4-C4HTG-X4T3X-2YV77 |
| Windows 10 Pro N for Workstations | WYPNQ-8C467-V2W6J-TX4WX-WT2RQ |
| Windows 10 Pro Education | 8PTT6-RNW4C-6V7J2-C2D3X-MHBPB |
| Windows 10 Pro Education N | GJTYN-HDMQY-FRR76-HVGC7-QPF8P |
| Windows 10 Education | YNMGQ-8RYV3-4PGQ3-C8XTP-7CFBY |
| Windows 10 Education N | 84NGF-MHBT6-FXBX8-QWJK7-DRR8H |
| Windows 10 Enterprise | XGVPP-NMH47-7TTHJ-W3FW7-8HV2C |
| Windows 10 Enterprise N | WGGHN-J84D6-QYCPR-T7PJ7-X766F |
| Windows 10 Enterprise S | NK96Y-D9CD8-W44CQ-R8YTK-DYJWX |
| Windows 10 S | 3NF4D-GF9GY-63VKH-QRC3V-7QW8P |
Create the ISO
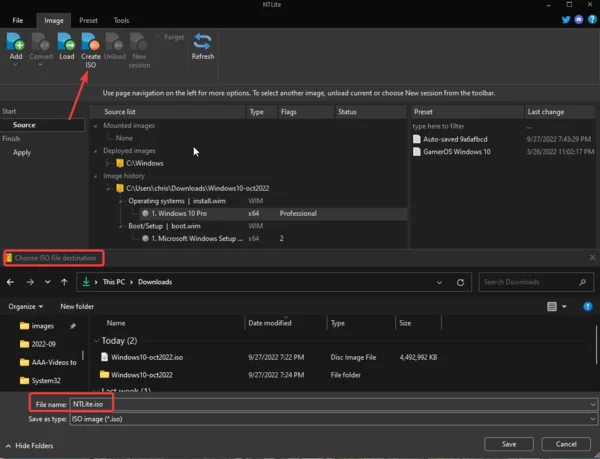
Finally, we are ready to make the ISO. Just Click “Create ISO” and select the location to save it.

Next Steps
After you have made your ISO file you are now ready to install and finish your configuration
Check out my Windows Utility script and set the Security Updates, Install Extra Programs, and more @ https://christitus.com/windows-tool/